Raspberry Pi Network Connection
Most of the time, the Pi doesn’t need an internet connection. There are, however, a couple of cases where you may want some sort of a network connection to the Pi.
These are:
- Downloading data from the Pi to a computer (requires a network connection but not internet)
- Initial setup with cloud-init (requires internet)
- Updating code by pulling from GitHub (requires internet)
Setting up network interfaces
With cloud-init (first-time setup)
The preferred way to setup network interfaces is by providing them in the
network-config file read by cloud-init when first setting up the Pi.
An example is shown below:
# This file contains a netplan-compatible configuration which cloud-init will
# apply on first-boot (note: it will *not* update the config after the first
# boot). Please refer to the cloud-init documentation and the netplan reference
# for full details:
#
# https://cloudinit.readthedocs.io/en/latest/topics/network-config.html
# https://cloudinit.readthedocs.io/en/latest/topics/network-config-format-v2.html
# https://netplan.io/reference

version: 2
ethernets:
  eth0:  # Your ethernet name.
    dhcp4: no
    addresses: [192.168.11.137/24]
    gateway4: 192.168.11.1
    nameservers:
      addresses: [8.8.8.8,8.8.4.4]
wifis:
  renderer: networkd
  wlan0:
    dhcp4: true
    optional: true
    access-points:
      "<YOUR WIFI SSID HERE>":
        password: "<YOUR WIFI PASSWORD HERE>"
The above configuration sets up a static IP over the ethernet interface. It
also configures 192.168.11.1 as the default gateway. This allows for sharing
an internet connection from a computer over this interface if desired.
The configuration also provides an SSID and password for a WiFi network. In practice, we configure this to the settings for a phone hotspot that can be used to get internet when WiFi is not otherwise available. This is also a simpler setup for getting the Pi on the internet when needed.
Reconfiguring with netplan
By default, network interfaces are configured with netplan. See the netplan documentation for more details.
Configuring your computer
If you’re connecting to the Pi via a simple ethernet cable to your computer,
you’ll want both configured with static IPs. The config file above will do this
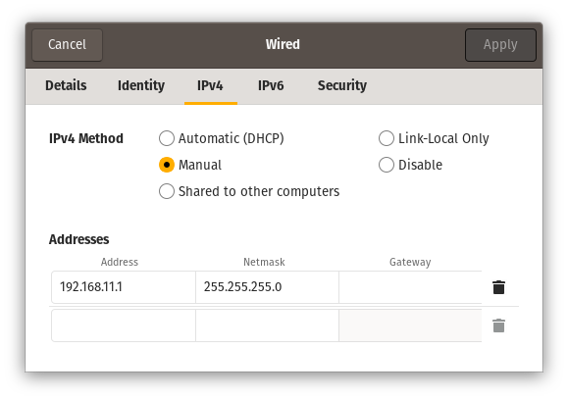
on the Pi side. On your computer, you’ll want to set a static IP of 192.168.11.1
and a netmask of 255.255.255.0. For example, your settings may look like this:

Example laptop configuration to connect to the Pi over an ethernet cable
Sharing internet from your computer
Do you need to do this?
This process is a little annoying to setup. If you can easily connect your Pi to a separate WiFi network with internet access, you probably don’t need to do this.
If your WiFi network requires complicated configuration to join, requires a key or password you don’t want to leave around on the Pi, or only allows some devices to join, this is an alternative approach that only requires a separate computer (i.e. your laptop) to have internet access.
Sharing your computer’s internet connection from one network interface to another is a useful trick to get an internet connection for the Pi. This can be done between any two network interfaces (i.e. from your WiFi connection to the Pi over ethernet or from one WiFi card to a network created by a second WiFi card).
The Arch Linux wiki has useful instructions for configuring internet sharing on Linux.
To briefly summarize them:
All of this setup will happen on your laptop (or whatever computer has an internet connection).
- Enable IPv4 forwarding:
sudo sysctl net.ipv4.ip_forward=1 - Setup NAT with iptables: (See note below if you have docker installed!)
sudo iptables -t nat -A POSTROUTING -o wlan0 -j MASQUERADE
sudo iptables -A FORWARD -m conntrack --ctstate RELATED,ESTABLISHED -j ACCEPT
sudo iptables -A FORWARD -i net0 -o wlan0 -j ACCEPT
Where wlan0 should be replaced with the name of the network interface on
your computer which is currently connected to the internet, and net0 should
be replaced with the name of the network interface on the same computer which is
connected to the Pi.
Note for Docker users
If you have docker installed on your system, it changes your default firewall settings . As a result, you need to setup NAT slightly differently:
sudo iptables -t nat -A POSTROUTING -o wlan0 -j MASQUERADE
sudo iptables -I DOCKER-USER 1 -m conntrack --ctstate RELATED,ESTABLISHED -j ACCEPT
sudo iptables -I DOCKER-USER 2 -i net0 -o wlan0 -j ACCEPT